Friday, September 5, 2014

grainline alder shirtdress, take 2

I liked my first stab at the Alder Shirtdress so much that I decided to make another one.

grainline studio alder shirtdress view b, shirt dress

Evan was a good sport and helped me take a bunch of pictures during our walk. Maybe too good a sport. I actually really don't like to be photographed.

grainline studio alder shirtdress view b, shirt dress

This one is also made of cotton that I got in Sham Shui Po. The fabric looks like when you flick toothbrush bristles to spray paint everywhere. It also makes me think of somebody who's just thrown up birthday cake. I like it!

grainline studio alder shirtdress view b, shirt dress

Notes:

  • Raised the bust darts by about an inch.
  • Instead of trying French seams again, I used the sewing machine's overedge stitch with the overedge stitch foot.
  • The overedge stitch foot is awesome! It's great for topstitching.
  • Used this tutorial by Four Square Walls for the collar bit because reading through the Grainline sewalong tutorial still confuzes me. Sigh.
  • Accidentally put the topmost button at the top of the button band rather than on the collar stand... heh heh heh.

grainline studio alder shirtdress view b, shirt dress

Next time (and there will be a next time):
  • Raise the pockets by about an inch.
  • Make it in this black/white fabric that Mummy chose. It'll look totally different, I'm sure.
MAKE IT! The pattern is amazing!


Sunday, August 17, 2014

Grainline Alder Shirtdress

This post is about the Grainline Studio's Alder shirtdress.

So I got really excited to do the Alder Sew-Along. Maybe a tad too excited, because I jumped the gun and made one before Jen finished posting all the tutorial thingies!

grainline alder shirtdress, view B
Knitting, biking, and eating junkfood at the park. My kinda day.

I made view B because I thought it might look more flattering than view A.

grainline alder shirtdress, view B

grainline alder shirtdress, view B

Notes
  • I made a size 2 because it matched my measurements pretty much to a tee.
  • I tried to do French seams... and ended up having to fudge the bit around the pivot point (where the skirt fronts meet the front) because I had no idea what to do re: the French seams! I am looking forward to seeing suggestions from the sew-along about this.
  • I misread the bit about attaching the collar and nearly messed the whole thing up, but managed to fudge stuff around a bit. I think it looks okay because the fabric is so busy.
  • This is some cotton I got in Sham Shui Po in Hong Kong.
  • These pictures are bad. Maybe I'll post a better one later.
grainline alder shirtdress, view B


Monday, August 4, 2014

Simplicity 1880 faux wrap dress

Here's my first stab at Simplicity 1880. I made style B, the fake-wrap version.

Evan helped me take these pictures.

simplicity 1880 faux wrap dress


I had made a muslin for this dress, which helped me determine that the waist was around 2 inches too high and the front gaped like mad (hooray for flatness). For the ~real~ version of the dress, I lengthened the bodice so the waist actually hit my waist, butI  didn't do a small bust adjustment. I should have!!!

simplicity 1880 faux wrap dress

The result? The "wrap" neckline bit gapes quite a bit. I ended up sewing the overlapping pieces together to avoid, um, flashing the universe. But for future renditions of this dress I will definitely figure out how to do an adjustment.

simplicity 1880 faux wrap dress

I had done a sloppy job with the invisible zipper because I thought watching a 10-minute tutorial video would be too time-consuming. Ha! Another lesson learned. Feeling productive a couple days later, I unpicked the zipper and re-inserted it and now it looks much better! I mean, I spent so long on the dress anyway, so why was I willing to settle for the ugliness that was the zipper?

simplicity 1880 faux wrap dress

I made this dress out of cotton that I got in Sham Shui Po in Hong Kong. Mummy picked out the fabric for me. Sham Shui Po is fabric HEAVEN!!!! Blocks of streets lined with shops filled with fabric swatches, and roadside stalls with fabric on bolts and rolls. Roadside stalls selling muslins and rows of shops selling buttons, zips, leather, and all kinds of other sewing bits and bobs.

Here are swatches of the other fabrics I got! At 35 HKD a yard (around 5 CAD)... how could I say no?!

sham shui po fabric shoppingI'd gone to Sham Shui Po by myself earlier but was not confident in my Cantonese skills to actually try buying anything. That, and I was scared they were all wholesalers. With Mummy's help, we were able to determine that you have to order a minimum of 3 (or was it 5?) yards of fabric and then return to the shop to pick it up a couple days later.

simplicity 1880 faux wrap dress

Oh, and I learned how to slip stitch for the sash. Cool!

Reversible bag

Saw this bag by Very Purple Person on Pinterest and decided to make one of my own because I don't have a purse to carry stuff around in. The pattern is clear and very easy to follow!

I didn't have a good fabric to match it up with so I ended up using the same fabric for the inside and outside. I added a little pocket to the inside for my phone and wallet.

very purple person reversible bag

City Gym Shorts!

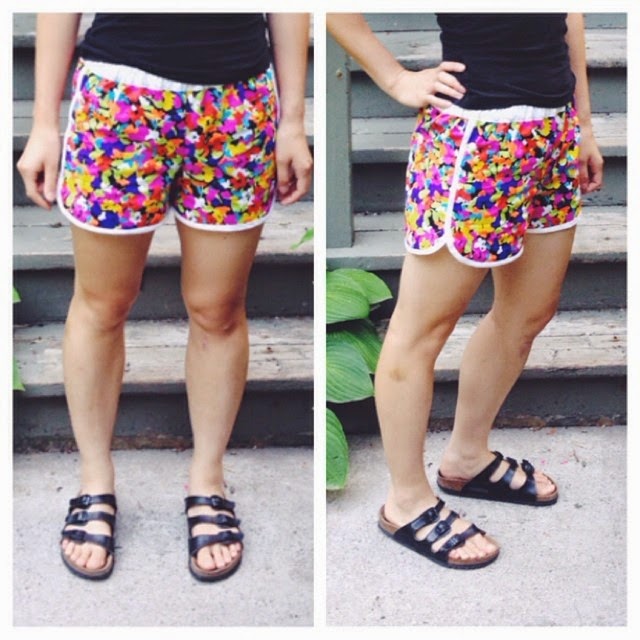
It seems like every sewer (sew-er?) on Instagram is all about these City Gym Shorts from Purl Bee... including me! They are flattering and adorable.

purl bee city gym shorts

Used the leftover bright floral fabric from my Circle Skirt dress to make these. I got the fabric from King's Textiles at Queen and Spadina. It might be for quilts. I don't know. It's cotton.

purl bee city gym shorts

BRB, I'm going to make some more.

Rectangle dress

This was my first attempt at, um, making up my own design. Basically I cut out two slightly-wider-than-me-sized rectangles, sewed them together (with French seams), bias-bound the neckline and armholes, hemmed the bottom, and made a tie belt. Oh, and I put in a pocket.

The fabric is from a thrifted bedsheet from Value Village.

bedsheetdress

After making that, I decided to make my twin sister Jessica and me matching dresses out of blue linen! Who wore it better? She did! Accesories are key.


Pretty Jess in a blue dress.


Me walking and talking.


Circle skirt dress!

I don't quite remember how but I came across this awesome video tutorial by Annika of the Pineneedle Collective and was inspired to make one of my own.

Ta-da!

circle skirt dress #diyannika

The bright blue exposed zip.

circle skirt dress #diyannika

Holding a fake bird at the strange mall display.

circle skirt dress #diyannika

Feeding a duck.

circle skirt dress #diyannika

I fudged a bodice out of the Wiksten Tank pattern, used bias facings on the arms and neckline (as per the Wiksten tank) instead of lining it, and I left out the waistband.

The only thing is I regret not staystitching the waist of the skirt. It's stretched out a little bit.Oh, and I wish I'd done a neater job with the zip. But it was really fun to make.

The End.

Wiksten Tank photo dump

Here's a dump of photos of the Wiksten Tanks I've made.

#1. This is the first one I made. I sewed it without prewashing the fabric first. BIG MISTAKE! It became like a vegetable. Plus the neckline is too low :( I've still worn it a couple of times. Mostly to sleep.

wiksten tank

 #2. This is the one I made at The Workroom during the Wiksten Tank class. Made me want to ditch our Singer machine for a Bernina! Not happening any time soon though! The fabric is some quilting cotton covered in poppies, which I realize might be sort of inauspicious. I like it anyway.

wiksten tank


 #3. This is the one I made out of some adorable fabric covered in seals!


wiksten tank

wiksten tank

#4. And this again is the dress with the upside-down fish, taken somewhere within Forbidden City during our trip to Beijing.

wiksten tank


Monday, April 28, 2014

Wiksten Tank Dress with elastic waistband and... POCKETS.


ughhhhhhhhhhhhhh


So after making a bunch of Wiksten Tanks (pics later), I bought some cool fabric thinking I'd make matching tank tops for my twin Jessica and me. My thought process behind choosing this fabric: we are pisces and her wardrobe is full of black, white, grey, and stripes. So I thought this might add a bit of colour. Um, a lot of colour.

UMMMMM, what was I thinking?!

Lucky for Jessica, I didn't have enough of the fish fabric to make two tank tops. So I decided to make myself a dress instead. With an elastic waistband (because the dress looks like a mumu on me otherwise) and pockets (because I hate carrying a purse. In fact, I don't really own one).

Hooray, my first ever dress!


Evan took this picture of me when we rode our bikes up to the bluffs. FUN!!!

Mods:

  • raised neckline by 3/4''
  • S in armholes, neck, but traced between XS and S for side seam
  • added pockets using this tutorial. (Next time adjust from 1/2" to 5/8" to match the 3/8" seam allowance. I don't know what I'm talking about here but I feel like I should remember this note for next time.)
  • added an elastic (made it up): cut out a bias casing from fabric, 3" wide, as long as the dress. Sewed it along waistline.


MISTAKES!!!!!


the dress of dead fish.

  • the fish are upside down!!!! What was I thinking?
  • the bias tape facing at the neckline and armholes doesn't lay flat. I think that next time for the first step I'll sew it at a 1/4'' seam allowance (instead of 3/8'') -- is this an error in the pattern? I don't know. Or use this tutorial from grainline for getting bias necklines to stay flat
  • the bunching of the fabric because of the elastic waist looks a bit awkward but I don't really care that much.


NEXT TIME:

  • Try cutting the top part and the skirt part separately. Would eliminate some of the bunching.
  • Don't cut fabric after midnight.

Bye!!!!!!!!!!!

adventures in sewing: ORIGINS!!!

Sometime in 2009, prompted by a section of The Artist's Way, I made a list of ten things I wanted to do at some point. I've since lost the list but I remember that two of the things were learning some form of martial arts and taking up sewing.

Fast forward to 2014. I enrolled in the Sewing Machine Essentials and Wiksten Tank classes at the workroom last month. As someone who doesn't spend that much time in the west end of Toronto (I live near the Beach), I found out about the workroom in a roundabout way. I'd made a fun hat using a Wiksten pattern that I'd purchased through Ravelry.

my snöflinga hat

Soon I found myself on the Wiksten Made website, where I came across the Wiksten Tank pattern. After a bunch of Googling and clicking I discovered Karyn's blogpost about all the tanks she'd made using the pattern -- and that Karyn ran the workroom.

~~ instant inspiration ~~

I signed up for classes and now I've pretty much quit knitting to sew stuff instead. My poor stash of yarn is languishing in a pile by the window like dried-up once-soggy ramen. I've sewed a bunch of things since.

The first thing I sewed (during the class) was a cushion cover. My cushion is poufy and ugly.

poufy pillow + a drawstring bag


Then I learned how to make zipper pouches on the Internet.

Peggy Pointer zipper pouch using this zipper pouch tutorial from Pink Polka Dot Creations

Underwear Tiger zipper pouch using same tutorial as above. I made the patch thingy out of felt.

Underwear Tiger zipper pouch using this Half-Circle Zippered Pouch tutorial from Lula Louise

Then I made a bunch of zipper pouches featuring a linocut print of my design -- meet Commander Catfield and Félicette, the first cat in space! These will be for sale at Story Planet.

STOP: Cats in space!

Cats in space!

Random zipper pouches/coin purses.

Commander Catfield.

Félicette.

 A post with all the Wiksten Tanks to come. I should probably warn you that I know nothing about buying fabrics and I think I have no taste. You've been warmed!